War of the Third Coalition
14 October 1805
French VI Corps under Marshal Ney, 14,473 men and 28 gunsAustrians under FML Count von Riesch, approximately 15,000 men and 14 guns
Weather: Miserable; chilly with intermittent snow, sleet, and rain (50% chance of precip.)
Location: Ober-Elchingen, Germany, 48°27′06″N 10°05′52″E
First Light: 06:07 Sunrise: 06:39 Sunset: 17:34 End of Twilight: 18:06
(Calculated from U.S. Naval Observatory from location and date)
Something's Not Right
This, the fourth and final, small battle prior to the surrender of the Austrians at Ulm in the Austerlitz Campaign, is a puzzling one. That it was a French victory was pretty certain. In fact, Napoleon was so pleased with Marshal Ney's performance in it that he gave him a title for the victory, le Duc d'Elchingen. But why it was a French victory was not so clear. If you read the narratives it seems as though, at the outset, the Austrians had all the advantages; initial superior numbers of both infantry and cavalry, and a strong position on the high ground overlooking a marshy river crossing with a single, narrow bridge (one span of which had been burned). They also had two strong points to anchor their flanks, the villages of Ober- and Unter-Elchingen. But they folded, and fairly soon (the battle was over by early afternoon). And this after only a fraction of Ney's forces had hit them. It was like one of those football games where one team just knows it's going to lose, and so proceeds to lie down and wait for the inevitable.What I want to explore in this post is why the Austrians, with all their tactical advantages, still buckled. Were you to play a wargame of it, the Austrian player should always win (unless it was one of those wargames where the rules are artificially stacked in favor of the historical winners). All he would need to do would be to cover the Danube crossing with a crossfire of artillery and infantry and chew up the French as they attempted to repair the wooden bridges.
Part of it, in my opinion, is just the result of bad leadership, specifically of General Mack again (see my previous posts, Wertingen, Haslach-Jungingen, and Günzburg). It is a study of how loss of confidence, not in one's abilities but in one's leaders, can cause a fiasco. The disaster for the Austrians came from the top down, not through any inherent weakness on the part of the fighting men.
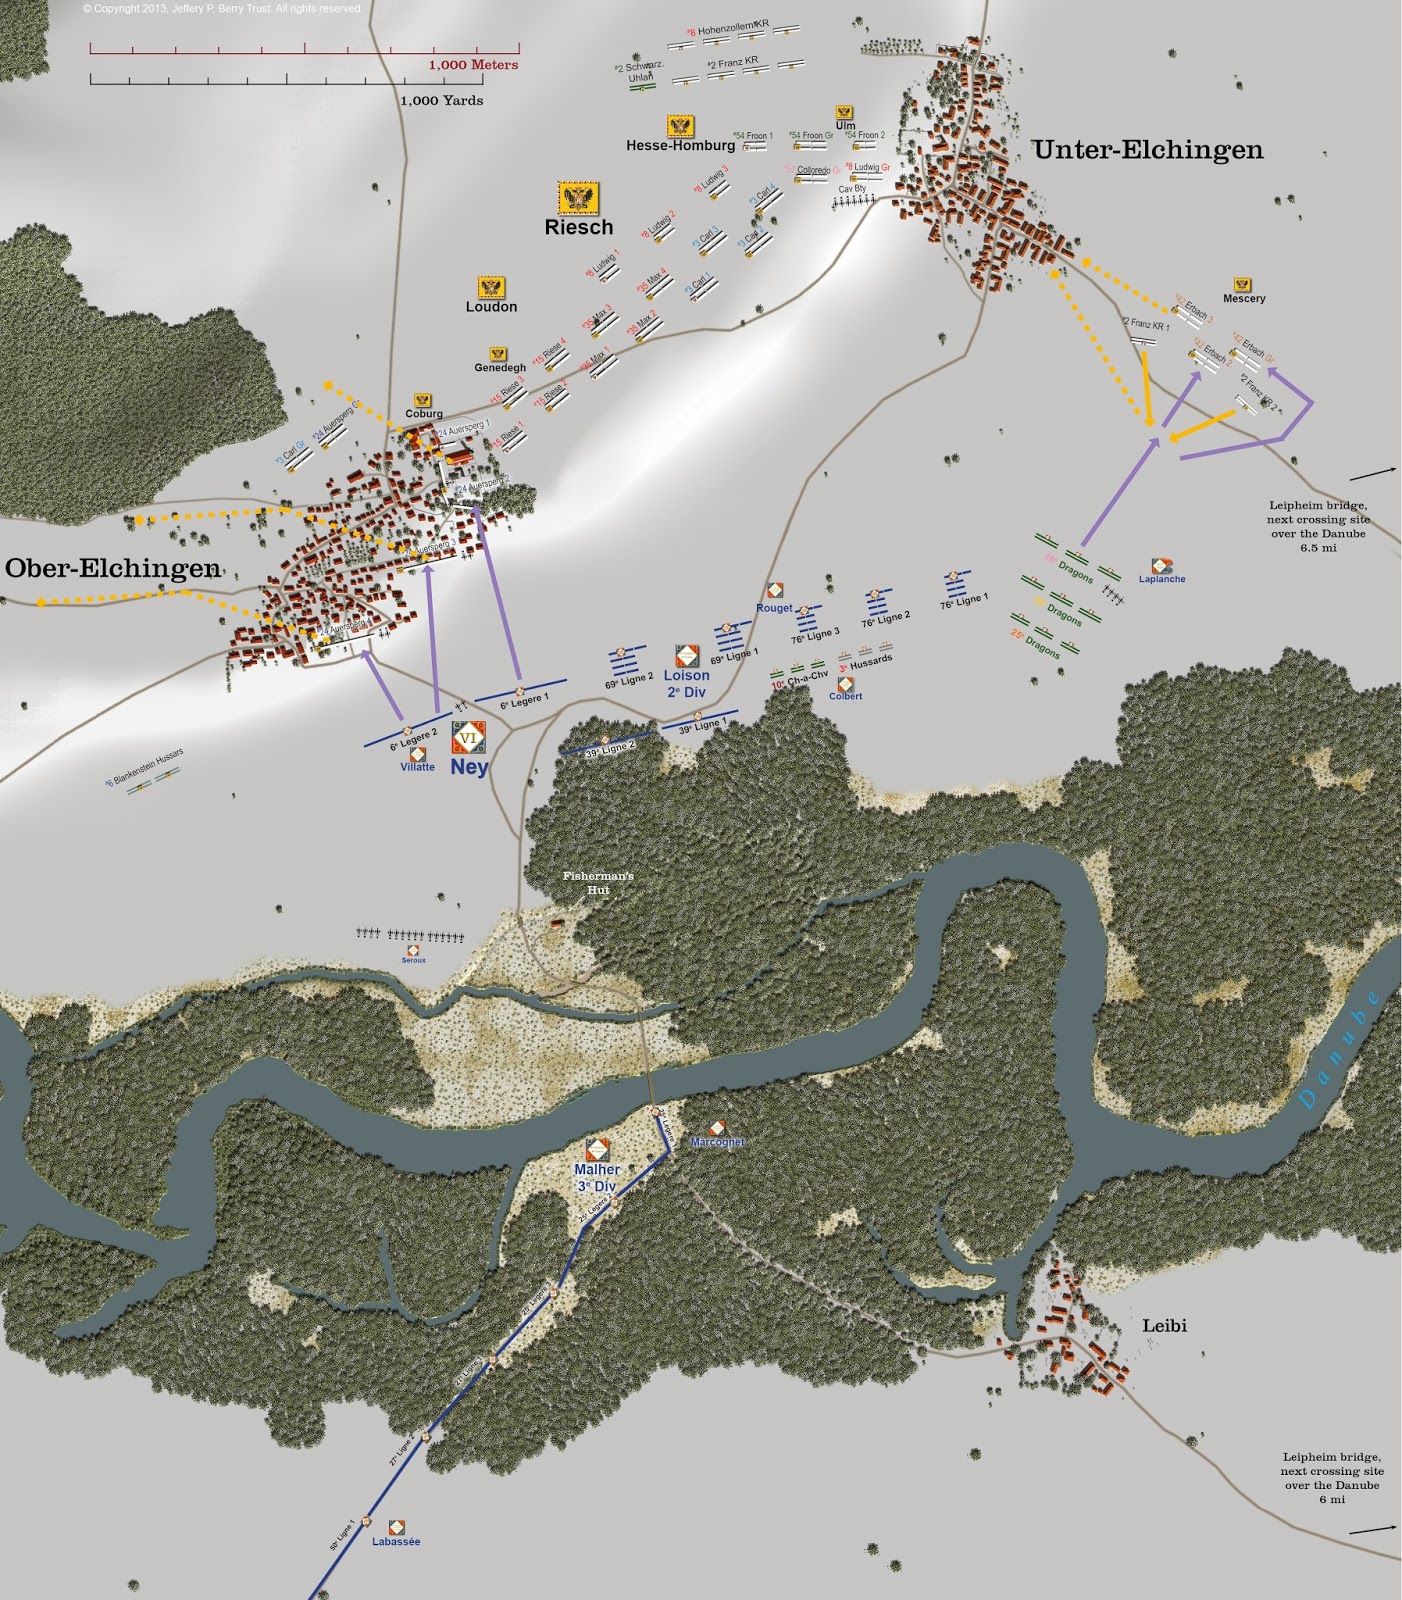
Battle of Elchingen: Situation at 09:00. The map was created referencing a combination of the highly detailed battle maps in Scott Bowden's Napoleon and Austerlitz as well as satellite images from Google Maps, from which I rendered the villages from what appeared to be the "old town" sections of those places today. I have depicted the landscape as covered in snow, since it had, apparently, been snowing and sleeting for over a week. The deployment and order of battle of the Austrians between Genedegh's command and the village of Unter-Elchingen are speculative on my part, though,according to Bowden, these regiments did take part in the battle. All footprints of the units are accurate based on reported strengths and formations. Bowden also describes the Austrian infantry as being formed up in columns of division (two companies wide) in a checkerboard formation. Though the maps of this battle that I have researched show the Austrian infantry not quite extending across the gap between Ober- and Unter-Elchingen, given the reported order of battle, the strength of the battalions, and the need to allow for sufficient space between the columns to deploy into line, it is my estimation that 20 battalions would not be able to form up in this space unless they were in three lines, which I have shown.
Narrative continues below the map

I have covered the strategic situation of this part of the Austerlitz campaign in more detail in my previous posts on The War of the Third Coalition (Wertingen, Haslach-Jungingen, Günzburg ). At this date, though, Napoleon had pretty much boxed the de-facto Austrian commander-in-chief, Karl Mack, into Ulm from all sides. On the 13th and after his previous attempted breakout on the 11th at Haslach-Jungingen, Mack, still trying to figure out what was going on, had another brilliant idea. He sent Riesch with 15,000 men about 8 miles down the Danube from Ulm to do something at the crossing at Elchingen. Riesch, in fact, wasn't sure what his orders were. Mack's written orders read like the kind of enthusiastic but indecisive boss many of us have probably had in our own careers (it isn't confined to just the military), vague and rambling. Here, for instance, is one "order" he had sent to Riesch on the 13th:
Ulm, 13 October 1805, in the evening
My convictions!
Bonaparte stays with the main column headed for Weissenhorn. He has done so because of the great difficulty in crossing the terrain on his way to the Iller which he intends to cross.
A glance at the map shows that it would be nonsense to rush forward after Wiessenhorn because you would have to go back after Günzburg and that the Danube presents yet another detour to cross. This way from Günzburg is also difficult to travel due to the nature of the terrain.
What we ought to do then, is to attack him first at Weissenhorn or at least on the day where he attempts to cross the Iller. Perhaps if by tomorrow he still has not crossed, then it presents a great chance, if he has not first taken the turn at Memmingen, that the column from which there is attempting to cross by the left bank of the Iller should be left behind. This would present a favorable opportunity to eliminate or annihilate this part, and if we fail to do so, he would probably think us foolish for not trying.
The column advancing against Memmingen and the one on the left bank of the Danube are watching over this line of retreat. At least we must consider about taking the trouble to block this route of retreat and make it more difficult for him to reach the Rhine. Perhaps by then something will have happened to prevent him from crossing, especially since a Revolution has broken out.One can only imagine what Riesch thought as he read this monologue (or passed it around his staff to see if anyone could make heads or tails of it). There is not a single imperative clause in it. It reads like a stream-of-consciousness dictation from someone who likes to "think out loud." It is packed with conditional clauses and "perhaps." Most of the speculation in it comes from misinformation that Napoleon had planted (especially the incredible claim that Revolution--a coup--had happened in France, a completely bogus bit of misdirection that one of Napoleon's agents had planted by talking loudly at an inn frequented by Austrian officers). And the opening line, "My convictions!" could not have been more ironic (notwithstanding the use of the gratuitous bang.)
This was, apparently, Mack's "inclusive" style of leadership; to share what was on his mind with everyone and not take any decisive steps. It must have been maddening to work for him. But more critically it would have drained any confidence his subordinate commanders would have had in their commander-in-chief.
Moreover, Riesch, though a competent enough commander himself, did not know what he was expected to do by going over to Elchingen. Was he supposed to secure the Danube crossing for the Austrian army? Was he supposed to prevent the French from crossing? And what was the rest of the army doing? Was he supposed to follow it? And when? Mack did not say. He was sounding more like a cable news pundit than a commander-in-chief.
The Morale Factor
In the context of background, too, we should appreciate that the morale of the Austrian army was, by this stage of the campaign, pretty much drained. They had been out-maneuvered and beaten at every encounter with the French so far (though, from Riesch's point of view, they had, at least, driven back Dupont's outnumbered division at Haslach-Jungingen a few days before). Their self-confidence was nil. Add to this the confusing reorganization of the army by Mack on the eve of the war, as well as the high proportion of raw recruits in the regiments, and you have a foregone conclusion; defeat.The French, for their part, were at the peak of their morale and training. La Grande Armée would never be at such a high state of readiness. In terms of organization, tactics, equipment, and command professionalism it was the first truly modern army of the 19th century. Besides being, for the most part, veterans of twelve years of combat, these soldiers had been training together intensely for two years at the vast military installation on the Channel coast known as le Camp de Boulogne. And now it was paying off.
They also still had ideology on their side, seeing themselves as free citizen-soldiers fighting for a revolutionary, republican cause (in spite of the fact that they were under the orders of a newly self-proclaimed emperor). The typical Austrian soldier, by contrast, was a conscript, unaware of any cause he was fighting for except at the tyrannical whim of a moribund oligarchy. He was led from the rear, whipped forward by aristocrat officers and their lackey NCOs, while the typical French soldier was led from the front by officers who had earned their leadership from the ranks. This, perhaps more than anything, was responsible for the series of Austrian defeats up to this point and for the one about to occur again on the 14th.
Riesch Gets Ready
On the evening of the 13th, Riesch's corps, marching east from its position around Haslach, about 3 miles (5 km) away, had encountered some French tirailleurs and cavalry in the hilltop town of Ober-Elchingen, which it drove out of town and across the river.Riesch then proceeded to deploy his men to defend the crossing over the Danube. Breaking up the two divisions under his command (von Loudon's and Hessen-Homburg's), he garrisoned Ober-Elchingen and its walled convent with four battalions of the Auersperg #24 IR, these supported with six 6-pounder guns. On the western side of the village, he positioned two squadrons of the Blanckenstein #6 Hussars and behind it he put in reserve two battalions of grenadiers (from Carl #3 and Auersperg #24). Forward of Ober-Elchingen, guarding the crossing, he stationed two battalions of the Froon IR #54 and two 6-pounder guns. Between Ober-Elchingen and its sister village Unter-Elchingen, on the reserve slope of the rather steep plateau rising from the Danube floodplain, he arranged 20 battalions of infantry (approximately 8,000) and 9 squadrons of cavalry (almost 1,000), plus the remainder of his guns, a cavalry battery armed with four 6-pounders and two howitzers. He did not place any troops in the village of Unter-Elchingen, but instead had four battalions of the Erbach IR #42 and two squadrons of cavalry (Franz #2 Kuir. Regt) occupy the low ground below it, facing to the right flank of any French crossing (see map above). All told he had approximately 15,000 men (based on Bowden; see OOB below).
But Riesch had very few guns to support his force; just twelve light 6-pounders and a couple of howitzers, but no heavy 12-pounders. Normally each Austrian battalion would have had two 6-pounders attached as close support, which should have provided a total of 66 guns. However, due to the wastage of horseflesh during the campaign so far, there were just not enough horses to drag that many through the muddy roads. And there was a shortage of ammunition. So Riesch had to make do. The French, though they had to contend with the same mud, were ultimately able to bring up 28 guns into the fight, including four, long range 12-pounders.
During the night, which apparently was clear for the first time in days, Riesch and his men were unsettled by the sight of thousands of campfires across the river for as far as they could see. Mack's optimistic belief that the French were in headlong stampede down toward the Iller River to scramble back to France was evidently wrong. These campfires were close to the Danube.
Ney Gets the Orders He's Been Wanting
 |
| Marshal Michel Ney by Francois Gerard |
The morning of the 14th was sunny for a change (after days of rain and snow). Ney began to move his men toward the bridgehead. While he was at Imperial Headquarters getting his orders directly from Napoleon, he saw Murat and taunted him. The cavalry marshal had had temporary authority over Ney the previous few days (see my post on Haslach-Jungingen) and had ordered his corps over to the south side of the Danube, against the red-headed Ney's objections. During the snit Ney had protested that the order contradicted Napoleon's plans and Murat had arrogantly replied that he only formed his plans "in the face of the enemy." On this morning Ney grabbed the flamboyantly dressed Murat by the arm and sarcastically jeered, "Come, Prince; come with me and form your plans in the face of the enemy!" Then galloped off to lead his attack. Murat evidently said nothing back and Napoleon, who had heard all about it and had already dressed Murat down for his previous strategic mistakes, probably just chuckled.
The previous day the French tirailleurs who had been chased back over the Danube had fired the northernmost span of the single bridge over the Danube (see map above). So now they had to rebuild it in the face of fire from the Austrians not 100 yards away. General Loison (Ney's 2nd Division commander) had formed an assault team of elite companies from the 39e Ligne and 6e Legere regiments to help his sappers accomplish this. They had brought up doors, shutters, and lumber from nearby Leibi village to nail onto the surviving framework of the burnt bridge, and in the process many were shot down. But within an hour there was enough of the bridge in place to allow the five companies of grenadiers and carabiniers to scramble over in single file and start pouring close range fire onto the defenders from the cover of the bank of the river.
At the same time, Ney had deployed eleven pieces of his corps reserve artillery on the south bank to support this assault. These guns were only 500 yards away and were able to devastate the two Austrian battalions and their two 6 pounders. Together, the fire from the French infantry and artillery was enough to force the Austrians to take cover and keep their heads down. Under this covering fire The French sappers were able to complete the bridge repair and by 0900 Loison was able to rush the first battalion of his 39e Ligne over and charge the two Austrian battalions, who fell back toward the main Austrian line.
Giddy with victory, the single battalion of the 39th continued to pursue the retreating Austrians of Froon #54 back toward Elchingen. Seeing this exposed and disordered French battalion, General Mecsery on the Austrian left sent one battalion of his Erbach #42 over to attack them in flank and support the retreating Froons. The Austrians also undoubtedly started opening fire with their other artillery from the heights onto this lone battalion. The two retreating Froon battalions rallied, turned and counterattacked with the Erbachs. But the French of the 39th reordered themselves into line and came at the three Austrian battalions at the run. This surprised the Austrians who let off a limp volley (going over the heads of the charging French) and ran.
The 39th kept charging up the hill after the fleeing Austrians. But when they crested the rise to the east of the Elchingen convent, they saw, for the first time, a vast Austrian host in front of them; all 20 battalions of Riesch's main line, supported by a thousand cavalry. It must have been quite a surprise. The lone French battalion was now caught in cross fire from the Austrian cavalry battery to their right and the infantry to their front. And now they saw two squadrons of Austrian cuirassiers (Franz #2 KR) bearing down on them. General Villatte, the French brigade commander who had led this banzai charge up the hill, kept his cool, though, and bent back the four right-hand companies of the battalion to meet the cavalry. The horsemen came on at only a slow trot (owing, apparently, to the soggy ground), and the French were able to pour volley after volley into them until the surviving horses refused to jump over the piles of bodies in front of them. So they stopped and went back.
The lone French battalion was doing all right for itself. But the fire from three of the Austrian battalions to their immediate front was taking its toll (I'm not sure which regiment this was, possibly Riese IR #15. However Bowden describes them as three "grenadier" battalions, so they could also be those of Carl #3, Auersperg #24 and Ludwig #8). Villate decided it was prudent to order a slow, fighting withdrawal from his "reconnaissance-in-force." The three Austrian battalions followed them down the slope equally slowly, continuing to fire as the French fired back, everybody still maintaining their order.
By now, though, the 2nd battalion of the 39th had made it over the narrow bridge across the Danube and had formed up in line beside the Fisherman's Hut, along with the detached companies of elites. The first battalion fell back to rally alongside these. The three "pursuing" Austrian battalions, seeing thousands of French forces thundering across the bridge and themselves dangerously exposed on the plain, decided to retreat back up the hill and resume their defensive positions on the plateau.
The Battle for Ober-Elchingen
While all this was going on, Ney and Loison had been feeding the entire 2nd Division across the repaired bridge as fast as they could. After the 2nd battalion of the 39e Ligne, next came the two battalions of the 6e Legere. Ney organized this latter regiment into line and led it straight up the hill at Ober-Elchingen. He had also had his artillery chief, Seroux, bring the corps artillery over the river, as well as Loison's divisional guns, and put them into battery to the left of the bridgehead. The French could now put a considerable amount of artillery fire onto the convent from about 1,000 yards.Ney personally led the 6e Legere into Ober-Elchingen village, fighting house to house and up the hill toward the convent, using a 4 pounder gun and a howtizer as close-infantry support to blast their way into fortified buildings. The two Austrian battalions holding the village itself (3rd and 4th battalions, Auersperg IR #24) and their four guns slowly gave way, house by house, until they surrendered or broke and fled into the woods behind the town. Inside the walls of the convent at the top of the hill, the two other battalions of the Auersperg #24 fired down on the French chasseurs climbing toward them. But Seroux used his large battery of howitzers, 12 and 8 pounders on the bridgehead to blast holes in the walls around the convent and force the defenders to retreat back into the cloister itself. This allowed the attacking light infantry to pour into the breeches and overwhelm the defenders. Both of these Austrian battalions also either surrendered or scampered over the convent walls into the woods behind Elchingen. Ney had secured both the village and the convent, keys to Riesch's right flank.
During this fight for Ober-Elchingen, the balance of Loison's 2nd Division (69e & 76e Ligne), including Colbert's light cavalry brigade (3e Hussards and 10e Chasseurs-a-Chevals) and three dragoon regiments from Bourcier's 4th Dragoon Division under Jean-Baptiste Laplanche (18e, 19e, 25e Dragons) had all been hustling over the bridge and deploying on the ground between the Elchingens and the river (see second map). Malher's 3rd Division was still marching to the bridgehead and had not yet crossed by late morning.
Elchingen: Situation about 11:00
Laplanche's Dragoons Take Care of Mecséry
After the 6e Legere had secured and refortified the convent on Riesch's right, Ney went back to see how the crossing was going. He saw that before he launched a major assault on the center of the Austrian line he would have to take care of the threat to his right from Mecséry, who had three battalions left (he'd sacrificed one to support the retreating Froon #54, remember) and two squadrons of cuirassiers (also of Franz #2 KR but not the ones who had attacked the 39th on the hill earlier).Laplanche launched a head-on charge with his first regiment, the three squadrons of the18e Dragons, right at the center of Mecséry's formation. The two Austrian cuirassier squadrons, though outnumbered, gamely met them midway. This would not have been a glorious, galloping "movie" charge but probably delivered by both sides at a trot at most, owing to the softness of the ground. In the melee that followed, the French overlapped the Austrian cavalry and forced them to retreat.
After disposing of the Austrian cavalry, Laplanche had the 18e Dragons move around to the left flank of Mecséry's three infantry battalions and brought up the 19e Dragons to charge them from the front, supported by two 8 pounder guns and two howitzers of horse artillery.
Why the Austrian commander didn't have his infantry form squares before this is a mystery. Normally, well-trained infantry in square could handily hold off attacking cavalry (as they did for hours at Wertingen the week before), usually making it harder on the cavalry. But for some reason Mecséry kept his infantry in columns of division (two companies in front, two supporting), a rather vulnerable formation to repel cavalry. Later the Austrian army would develop a formation called the battalion masse, which was very much like a 16th century tercio or ancient phalanx, with all the companies closed up tight. It could have been that during this stage of reorganization, the officers of the #42 Erbach were using some early form of this. Or it was possible that the under-led raw recruits of the #42 just weren't trained in forming square in 1805.
Whatever the reason, their column formation would have made them vulnerable to enveloping cavalry and especially to artillery, which the French brought up close to blast the compact column with canister.
The outflanked #42 did not stand long. Though a regiment of long, distinguished lineage from the Seven Years War, the generation filling its ranks in 1805 was not that of its grandfathers. These panicked (probably cascading from left to right, one company at a time) and started a general rout, with every man for himself trying to reach the shelter of the nearby village of Unter-Elchingen. The French dragoons swept up hundreds of prisoners and a handful of regimental flags.
So much for the Austrian right flank.
1805 Austrian Infantry Column Formations. The left-hand formation is an example of the Column of Divisions that Bowden described the Austrian infantry as being formed up in during the battle. The right-hand formation is my speculation of what a closed-up, 4 company Battalion Masse formation might have looked like had it been used by Mecséry . This type of formation was used later in 1809 (with 6 companies) and had been talked about long before by Archduke Charles when Mack had taken over his reforms in 1804. Whether a version was used tactically or not in the 1805 campaign, I do not know. This illustration also shows attached battalion guns (which were used at Elchingen only by the Auersperg IR #24 and two battalions of the Froon IR #54)

Ney Attacks Riesch's Center
With both his flanks secure by about midday, Ney saw it was time to take on the Austrian center, where the mass of Riesch's forces were on top of the plateau. Deployed on the opposite slope (very much like the Allies at Waterloo), the Austrian rank-and-file could not have seen the French massing on the plain below. Ney's strike force for the main assault was the fresh brigade of Rouget, the five battalions of the 69e & 76e Ligne, supported by Cobert's light cavalry brigade with the 3e Hussards and 10e Chasseurs-a-Cheval.As the five French battalions approached the crest of the slope, they saw that their skirmish line had already found the hidden Austrians. The four left battalions of Rouget's quickly deployed from column-of-attack to line, while the right-hand battalion (1st bn, 76e Ligne) remained in column, ready to form square should the flank be attacked again by Austrian cavalry. Then they resumed their march and crested the slope. Both sides suddenly saw each other about 200 yards apart. The Austrians, already nervous, immediately (and prematurely) started opening fire. The French line withheld fire and continued to advance steadily and unshaken. When they came within effective musket range, they halted and all delivered a devastating volley, dropping scores of white-coats. The Austrians, though shaken, closed ranks and continued to fire. The firefight lasted a few minutes, during which the French, clearly gained the upper hand from their superior fire discipline. Apparently the Austrians, who had been firing from the beginning at a longer range, were also firing high (as untrained troops tend to do when firing at a target slightly lower than them), so their rounds were sailing harmlessly over the French. This had to be demoralizing as you see your own friends falling right and left but very few of the enemy.
The first regiment to break was the Riese #15 IR, which had been slapped hard three days before at Haslach-Jungingen. This regiment was on the extreme Austrian right, against the walls of the convent recently conquered by the 6e Ligne. It may also have been taking flanking fire from French light infantry in the convent graveyard. Their ammunition was also running short and their muskets were starting to foul. Like a cracking glacier, the four battalions of this regiment broke and ran, one after another. To their immediate left, the Maximilien #35 IR retained their order but began to fall back steadily (continuing to fire) to cover the retreat of their neighbors.
Elchingen. Situation about 13:00.

Riesch Makes the Right Decision
About this time, too, (13:00) Riesch could see on the plain below thousands more French reinforcements (Malher's 3rd Division) thundering across the bridge. With his right flank gone, he made the accurate calculation that further resistance was futile and ordered a general withdrawal back toward Ulm, hoping to leave the field with an intact force while he still had one.As this retrograde maneuver began to take place (back and to the west), Colbert's cavalry brigade crested the hill to the right of Roguet's infantry. Colbert saw that some the Austrian infantry columns in front of him were struggling to retain their formation as they withdrew. He smelled fear and saw his opportunity. The French grey hussars and green chasseurs galloped at the retreating Austrians like Tartars, waiving their curved sabres and screaming. The Austrians (Bowden says these retreating battalions were two from the Froon #54 IR and the grenadier battalion from the Auersperg #24 IR) fired at the charging cavalry and brought down some 75 (a staggering 25% casualty rate). But the French were unstoppable and kept coming, causing the Austrians to throw down their guns and up their hands. The charge, while reckless, managed to bag as many as 1,800 Austrian prisoners.
Roguet continued to press his five battalions forward, pushing the Austrians back north and west of Ober-Elchingen. At one point, a lone squadron of Austrian lancers (the Schwarzenburg #2 Uhlan R) charged the flank of the right-hand French regiment. This was the 1st battalion of the 76th, which had prudently remained in column-of-attack for the entire movement. From this highly flexible formation the French were able to form square quickly, in time to meet the charging lancers with rapid fire musketry. The green-coated uhlans were stopped and then broke up to chase down isolated French tirailleurs who hadn't yet made it into the square. But before the lancers could skewer many, Cobert's hussards and chasseurs came to the rescue and sliced into the distracted (and surprised) Austrians with their razor sharp scimitars, killing many and driving the rest off.
At this point (probably about 14:00), the battle of Elchingen was over. Malher had got his entire division over the bridge and in formation to the west of Ober-Elchingen, ready to cut off the retreating Austrians. But Ney told him to stand fast and let Loison handle the pursuit. Napoleon later criticized Ney for this decision to let Loison have all the glory and let Riesch escape. But in retrospect, I feel that Ney had acted wisely. He was not sure what other force lay behind Riesch and he thought it good to keep a reserve in immediate hand. And, as it turned out, all of these Austrians now hurrying back to Ulm would be marching out of that city within a week anyway, stacking their arms in surrender. So the loss of further life was avoided.
Waiter? The Check, Please.
The battle had cost the Austrians dreadfully; 4,000 killed or wounded and 3,000 captured, almost half the 15,000 that Riesch had with him. A further several thousand were declared missing as only 2,500 managed to answer roll call the next day in Ulm. Most of these missing were probably deserters as there had not been an enthusiastic level of participation among the Austrian infantry to begin with and undoubtedly saw the inevitable. It was amazing, though, that in spite of the Austrian personnel losses, they still managed to bring back all of their 14 guns, even the ones in Ober-Elchingen. The Austrian infantry may not have been all that game about the war, but the Habsburg artillerymen loved their guns.It was a fairly bloody affair for the French, too, who reported 1,589 lost, with the highest percentage of losses among the officers. This was the one downside to an ethos of leading from the front, your leaders got shot first. The highest percentage of losses, though, were among the light cavalry of Colbert's brigade, who suffered over 31% casualties. All told, of the 7,600 men engaged from Ney's VI Corps, almost 21% were casualties. The Austrians may have given up the field, but they also gave a good account of themselves before they did.
Defeat from the Top
So, in retrospect, here was a battle in which 15,000 professional troops of all arms, occupying strong positions, and defending a single, rickety bridge, were whipped by less than half their number. It wasn't because they didn't fight hard enough (the high French casualty rates refuted that).I think it was because of poor leadership. In the first place, in an 1805 Austrian regiment there were fewer than half the officers and NCOs than in a comparable French one. These officers hadn't had time to get to know their men or the new tactics under Mack's latest reforms. That the infantry fought almost solely in columns of division (while the French quickly changed their formations to fit tactical needs) indicated that the officers and men didn't know how to change formation under pressure. It is also likely that in an army that spoke several different languages (troops were from German, Slavic, Italian, French, Walloon, and Magyar speaking regions of the Empire) officers simply didn't know how to give orders to their men. And, unlike the French, these Austrian officers were, for the most part, aristocrats leading peasants--peasants who didn't want to be there in the first place. Essentially, the Austrian regiments were just mobs of raw recruits led by amateurs.
The French soldier and officer, by contrast, was highly motivated. In 1805 they were still animated by the ideology of the Revolution. They felt themselves free citizens of a free republic (the title "Empire" was merely a formality; it was an "empire of a free people"). They were mostly veterans of nearly a dozen years of war against the oligarchic powers. And for the previous two years they had been training intensely for just this new kind of war.
Another factor I believe was instrumental in the Austrian defeat was that, unlike the French, there was no formal high command infrastructure in the Austrian army. I have listed the order of battle below as appendixed in Scott Bowden's highly detailed Napoleon and Austerlitz, but this was not how the Austrians were deployed or organized on the field. Organizations such as "corps," "divisions" or "brigades" were ad hoc, informal groupings, liable to change with each day. So units didn't train together, maneuver together, and didn't know who was in charge. They were put into line at the whim of the field commander of the moment.
On the higher level, the top commanders of the Austrian side themselves were confused and demoralized. As I have pointed out, Riesch himself (and likely his immediate subordinates) were not sure what their mission was. The "orders" from Mack were rambling diatribes, written by somebody who was either senile or crazy or just plain incompetent. Riesch had merely been sent out to Elchingen to be ready for any number of possibilities that Mack was turning over in his mind. For the past month the Austrian generals had been sent this way and that on vague errands, exhausting their troops, their horses, and their supplies. And nobody knew what they were doing this far west in Bavaria to begin with.
So it ultimately has to be laid on the desk of the "unfortunate General Mack," the greatest amateur of all. He was just laughable.
The whole episode of the Ulm campaign reminds me of a time years ago in my own career when I went out to a meeting with the new Chief Marketing Officer of my ad agency's client. We were summoned there to hear about his vision of the new marketing direction for the company. All of the marketing professionals were there, from all of the agencies, design firms, PR companies, web-development and media companies. We all sat listening to the new CMO ramble on about who-knows-what for an hour, seemingly thinking out loud. At one point, a colleague of mine leaned over to me and whispered, "Well, we're f***ed."
I imagine a similar scene happening on the Austrian staff two hundred years ago. We've all worked for bosses like Karl Mack.
Wargame Considerations
Elchingen would be an intriguing "what-if" kind of wargame to try. I do not think, even given the poor leadership and level of combat efficiency of the Austrian infantry, that it was a foregone conclusion. The real vulnerability on the French side was getting across that bridge. The whole point of Elchingen, in fact, was a river crossing. If the Austrian player could prevent that, or make it too costly for the French player, the day might be saved for him.But there are some factors to consider in designing such a wargame.
Austrian Formation Limitations
Because the Austrian infantry was, for the most part, poorly trained, poorly led, and recently reorganized, it evidently had a limited menu of formations at its disposal. I believe the reason they were deployed in columns-of-division (two company front, two companies deep) was that they didn't know how to maneuver in line, or go from column to line to square in combat conditions. This would have halved the infantry's available firepower (since the back companies could not fire, at least forward). The French, on the other hand, were masters of quick evolutions and could move from one formation to another with dispatch. They could also reform and dress ranks much more quickly. In a wargame of Elchingen (or really any battle during 1805), whenever an Austrian infantry unit wanted to change formation, it should become disordered for a given amount of time, or until it could roll a rallying die each turn (a 6, say, could allow it to resume full order under the new formation). The French infantry should be able to change formation immediately, without this disordering penalty or test.The Action at the Bridgehead
The second bridge span over the Danube (the northern one) was burnt the night before the battle (ironically by the retreating French). It needed to be repaired by Ney's engineers in order that large numbers of troops (especially cavalry and guns) could cross. The engineers and impressed troops given this dirty job took a couple of hours to accomplish it, mostly nailing in house parts stripped from the unfortunate village of Leibi. The two Austrian battalions on the north side of the bridgehead made life pretty deadly for these engineers and their men. In a wargame scenario, a rule should be used to gauge the time needed to complete the bridge repair. And fire from any defending forces should slow that speed.At some point, the bridge was repaired enough that light infantry units (in limited numbers) could cross, balancing on the thin planks, diving into the water near the shore and wading the rest of the way. So a rule should also account for a stage of bridge repair where a limited number of foot units could cross per turn.
Holding off this bridge repair, and causing enough casualties on the French while they attempted to do it, would be vital to the Austrian player. Stronger Austrian deployment forward could make this easier (and subsequently harder for the French player). The longer the Austrian player can keep the bridge unusable, the greater his victory points.
Austrian Cavalry and Artillery
Elchingen was one of several battles in which the old regime practice of breaking up cavalry regiments into penny-packets was still used. Each brigade had only a couple of squadrons (about 200 men total) assigned to it. One "what-if" scenario to experiment with would be to mass all of the Austrian cavalry into one or two large formations, to see if they could achieve tactical advantage.The Austrians also parceled out their artillery into two-gun sections or single battalion guns. They did employ a cavalry battery of six pieces on the hill, but the rest of their artillery was rationed out to individual battalions as close support weapons. Another scenario would be to see if would make a difference if they massed their guns, as the French had done (Seroux's big battery at the bridgehead).
The Weather
It had been intermittently snowing, sleeting and raining for over a week. And, yes, this was early October. Remember, 1805 was still in the midst of what climate historians call the "Little Ice Age." Winters came earlier and left later (see Mollwitz earlier in my posts, which was fought in mid-April). But, though chilly and probably miserable for the troops on both sides to march and camp in, it was most likely hovering around freezing during the night and warming slightly by midday. Accounts suggest that the morning of the 14th the sun was out. But the ground would have been sodden and not frozen, with snow undoubtedly all over.In terms of this effect on a wargame, the roads would have been no more use in movement than the fields. Artillery would move more slowly and with more fatigue penalty. Artillery fire would, consequently, also be affected since roundshot and canister would not ricochet (burying themselves in the soggy ground), reducing the effective range to maybe half.
Orders of Battle
The following orders of battle are derived primarily from Scott Bowden's fanatically detailed and exhaustively researched work about the Austerlitz campaign, Napoleon and Austerlitz. The Wikipedia article on Elchingen cites Digby Smith's Napoleonic Wars Data Book as its source for the OOBs, but Smith's list for the Austrians differs greatly from Bowden's. This Wikipedia article also gives Ney a force of 20,000 at the battle (vs 7,600 who were actually engaged), even counting Dupont's 1st Division and d'Hillier's dismounted dragoon division as being present, when they were, at the time, as far as 13 miles north--in fact, Ney wasn't sure where they were. And it only gives Riesch 8,000. So I have relied on Bowden as my most reliable source. But that's my own bias.
The strength returns for the French units are based on Bowden's researched parade states (roll calls) for the battle and are precise. The Austrian strength returns are rounded from averages (hence the whole numbers), with reductions taken from those units that had suffered casualties from previous battles in this campaign.
Also, I have listed the Austrian forces under Riesch according to their formal command assignments (divisions and brigades). These, as you compare them to the maps, do not coincide with how the individual units were actually deployed. Unlike the French, the Austrians didn't keep their brigades and divisions intact, but broke them up and reassigned the battalions and squadrons on an ad hoc basis. In the 1805 campaign, this would have undoubtedly had a bad effect on how efficiently the commands worked together.
Key:
Command ,
besides listing the name of each command, this cell is also coded for primary
uniform coat color of the regiment.
Facing
is color coded in the facings of the regiment (e.g. cuffs, lapels,
etc.). Under this column, too, is the military symbol coding for the
command (division, brigade, regiment, squadron, etc. as well as the code
for the type of unit; infantry, cavalry, artillery).
Flag displays
miniatures of the flags carried into combat by the units, If blank,
either I could not find evidence or the type of unit did not carry
standards into battle, e.g. light infantry or cavalry.
Strength The strengths for the units are approximations, designated by the ~ in front.

References
Blond, Georges, La Grande Armée, Arms and Armor Press, 1979, ISBN 1-85409-411-4Bowden, Scott, Napoleon and Austerlitz, The Emperor's Press, 1997, ISBN 0962665576
Chandler, David, The Campaigns of Napoleon, McMillan, 1966, ISBN 978-0-0252-3660-8
Duffy, Christopher, Austerlitz 1805, Seeley Service, 1977, ISBN 085422128X
Esposito, Vincent & Elting, John, A Military History and Atlas of the Napoleonic Wars, Greenhill Books, 1999, ISBN 1853673463
Griffith, Paddy, French Napoleonic Infantry Tactics, 1792-1815, Osprey Publishing, 2007, ISBN 978-1-84603-278-3
Kagan, Frederick, The End of the Old Order: Napoleon and Europe 1801-1805, Da Capo Press, 2008, ISBN-10 0-306-81137-5
Muir, Rory, Tactics and the Experience of Battle in the Age of Napoleon, Yale University Press, 1998, ISBN 0-300-07385-2
Nosworthy, Brent, With Musket, Cannon and Sword: Battle Tactics of Napoleon and His Enemies, Sarpedon, NY, 1996, ISBN 1-885119-27-5
Online References
https://en.wikipedia.org/wiki/Battle_of_Elchingen
© Copyright 2014, Jeffery P. Berry Trust, all rights reserved. No part of this post may be used for republication or re-posting without documented permission of the Jeffery P. Berry Trust. However, feel free to link to this site as a resource from related sites.
This is amazing! Really enjoy these battles of 1805. Is there a chance you will do the 1809 campaign? My favorite battle is Teugen-Hausen which I would love to see done with your great website.
ReplyDeleteMichael
Thank you, Michael. Your enthusiastic response to my site is very heartening. I'm so glad I can entertain like-minded people. There is a chance I would do some similar posts on the 1809 campaign, so thanks, too, for that suggestion. I have done a detailed map of Aspern-Essling and have an OOB for it. Right now, though, I am working on Leuthen 1757 for my next post.
DeleteI look forward to your report on Leuthen I know some details, but i am excited to see some detailed battle report. These maps really make the battles come to life and easier to follow.
DeleteAnother vote for Teugn-Hausen. This Elchingen article is excellent. I plan to create an Elchingen scenario for the Napoleon's Battles miniatures rules, and I'll be referring to your work here.
DeleteJeff, this is just too good! I'm adding a link to this article on grognard.com and linking it with the "
ReplyDeleteHaslach 1805 / Elchingen 1805" board game. I like having this type of companion history along with the games that I play, and I'm sure many other grognards do, too. Thanks for the effort you put into your blog.
-Mark D.
Thank you so much, Mark, for your kind endorsement, and for the gracious link. Like you, I love having as much material as possible to refer to when I'm wargaming at battle.
DeleteDear Jeff,
ReplyDeleteyour blog is a very interesting and well prepared. I'm keen of Napoleonic battles and your site is very interesting, your maps are superb.
I'm member of an Italian wargame club and sometime we tried to reproduced Napolenic battles. A member of my club recommended me your site.
Unfortunately we have not reproduced one of the struggles you described above but please accept my compliments for your work. If you are interesting to miniatures this is my blog >>> http://rekostwargames.blogspot.it
Please consider that the maps included into my blog cannot be called with the "word" maps.
Marco
PS: sorry for my English
Mille grazie, Marco, per i gentili complimenti. And, yes, I am interested in miniatures wargaming (I have close to 30,000 painted miniatures myself), so I will definitely visit your own blog.
DeleteJeff
And don't apologize for your fine English. It is much better than my Italian.
Hello Jeff,
ReplyDeleteReading through your exelent battle reports.
However I have to pick a nit. You mention Jaques Laplanche and even provide a handy wiki link ( the former Benedictine monk, Jacques Laplanche ). However, as I was looking at that site, no mention was made of his military career.... And when I looked for other Laplanches, this one came up:
https://fr.wikipedia.org/wiki/Jean-Baptiste_Antoine_Laplanche. Seems to me that you picked the wrong one...
Otherwise I very much enjoy your battle pieces. They almost alwyas seem to be able to capture both the narative of the battle, and the reason why some of the decisions were made. And you enliven it with you opinion on the whole thing.
Also I was wondering if you are aware of the ((board)wargame) series Jour de Gloire, in which Haslach and Elchingen have been published:
http://jours.de.gloire.pagesperso-orange.fr/jdg_en.html
Regards, and keep up the good work!
Louis Kolkman
Good eye, Louis. Reviewing my sources on Laplanche, I can't find where I got that tidbit that he was a former monk. It's not mentioned (as far as I can find) in Bowden or Duffy. Thanks for the due diligence. I love my readers acting also as my proofreaders and fact-checkers. And one of the nice things about publishing online is you can change it (unlike a printed book). So thanks for the correction. Updated, including the link you kindly referenced.
ReplyDeleteI have heard of Jour de Gloire as a brand but don't own any of their games. There are so many commercial game publishers in the world today that I'm not surprised if even the most obscure battles have been rendered. When I started playing as a kid back in the late 1950s, there was basically only Avalon-Hill (Gettysburg, Waterloo, Tactics II, Midway were my first).
This is a magnificent post and inspired me to develop a scenario to use with the Napoleon's Battles rules. Played it through twice. First time a very historical outcome, but second time Ney was not so lucky and ended up dying while leading an attack.
ReplyDeleteMy AAR can be found here: http://onesidedminiaturewargamingdiscourse.blogspot.com/2018/07/battle-of-elchingen-14-october-1805.html
and here:
http://onesidedminiaturewargamingdiscourse.blogspot.com/2018/07/battle-of-elchingen-14-october-1805_22.html
So a mighty thanks for this post and I look forward to going through the other battles you have written up.
Dear Mister Berry
ReplyDeleteI am writing in regards to your tactics analisys. I do not remember where I read it, but General Mack introduced both a four and a six company columnar formation that could be used to repel cavalry. If this is so, it would explain why the infantry was so easily defeated. Explication: The officers knowing of the new formation probably left the infantry in the original column of divisions to draw the French cavalry in to get them as close as possible. Problem: As you say, the Austrian infantry had been gathered in such a hurry they didn't have time to train. Supposition: Maybe they weren't trained in formations at all?? Maybe they didn't know either the protected column or how to form battalion squares?
Are you familiar with the story of Nay surviving his execution and leading a long life in north and south carolina.
ReplyDeleteNo. Never heard that one. Is it the same source as the one about Hitler escaping to Paraguay?
DeleteHi, NEY 's execution was public and the tzar punished a russian officer who had gone over Ney 's body with his horse. Jean-Michel from Paris
DeleteProfessional-level military history. People have been awarded Master's degrees in the field for much less. The wonderful part about Ulm is N's marching orders to his corps commanders, and his instructions to Murat to basically create a whirlwind to cover the army's advance.
ReplyDeleteWhy, thanks so much for the kind compliment, Gerry.
DeleteYou are right in pointing to Napoleon's strategic brilliance in moving his corps to surround Mack at Ulm.